
Experiment name: Study on pattern making of a basic shirt.
Theory: A pattern is the actual copy of different parts of a garment that is made by cutting board paper after sketching on it. According to this pattern cloth is cut and then garment is made. For industrial production different patterns are made for different size and a marker is made with these different patterns for a large-scale production.
Objective of the experiment:
1) To know about pattern making of a basic shirt.
2) To know about its importance.
Measurement for Shirt:
Neck Size : 40cm
Chest : 100cm
scye depth : 24.4cm
Natural waist length : 44.6cm
Half back : 20 cm
sleeve length : 80cm
cuff size : 23cm
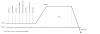
Body Section : At first indicate "0" point at the corner of a paper, then from '0' the line is extended (0-A) and form "0" drawn a straight line (0-B) at 90deg angel with (0-A) then
(0-1): Scye depth + 4 cm then from drawn a straight line in right side 90deg angle with (0-1).
(0-2): Natural waist length + 3cm, then drawn a straight line at 90deg angle from 2 to (0-2) at right side.
(0-3): Shirt length + 8cm then drawn a straight line at 90deg angle from 3 to (0-3) at right side.
(1-4): Half chest + 12cm, then extended to 4 to 5 in the up and 6 in down at 90deg angles with (1-4).
(0-7): One fifth of neck size - 0.5cm then from 7, drawn a line up at 90deg angles.
(7-8): 4.5cm then drawn the neck curve according to the figure.
(0-9): One fifth of (0-1) + 2cm, then from 9 drawn a straight line at 90deg angles with (0-9) in the right side.
(9-10): Half back + 4cm, then from 10drawn a straight line at 90deg angles with (9-10) in the upper and lower side and indicate 12 and 11 respectively.
(12-13): 0.75cm, then added 8 and 13 by slightly curved.
(10-14): 10cm
(10-15): 0.75cm then added 14 to 15 by slightly curved.
(1-16): Half of the measurement of (1-4) + 0.5cm then from 16 drawn a straight line at 90deg angles with (1-16), so that got 17 and 18.
(5-19): 4.5cm, from 19 drawn a straight line at 90deg angles with (5-19) according figure.
(19-20): One fifth of neck size - 1cm.
(19-21): One fifth of neck size - 2.5cm, then drawn the neck curve.
(10-22): 1.5cm, then from 22 drawn a straight line at 90deg angle with (22-11) at right side.
(20-23): Measurement of (8-13) + 0.5cm, then added (20-23) by slightly curved.
(1-24): One third of chest + 4.5cm.
(24-25): From 24 drawn a vertical line of 3.0 cm with (1-24) at 90deg angles in the upper then added 23 to 25.
(23-26): Half of (23-25), then added 13,10,16,25 and 23 and from 26, made arm hole by drawn a curve in inside of 1.0cm.
(21-27): 1.5 cm button stand, then from 27 drawn a horizontal line with (21-6) in downwards.
(27-28): 3.5cm for facing, then from 28 drawn a horizontal line with (21-6) in downwards and made a curve from 28 at upper by equalized with the neck curve.
(17-29): 2.0 cm.
(17-30): 2.0 cm
(18-31): 20 cm then drawn two curves of 16, 30, 33 and 29,32 and made side seam lines.
34: Drawn a midpoint of (6-18) and made a vertical line from 34 with (6-18).
35: Drawn a midpoint of (3-18)
(34-36): 4.0cm, then from 36, had drawn a horizontal line with (6-18) at right side.
Then drawn the curves of (33-35) and (32-36). If it is needed to keep pleat in the back of shirt then drawn a horizontal line with (9-37). In this way the half of face and neck and back of shirt can be made.

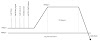
Sleeve section: In teh some way starting point "0" is indicated in graph paper.
Then,
(0-1): One fourth of arm scye measurement then from 1, extend the straight line in both sides with (0-1) at 90deg angles.
(0-2): Sleeve length + 3cm - {cuff width + half yoke length (0-13)}
3 : midpoint of (1-2), then from 3, extend the straight line in both sides with (1-2) at 90deg angle.
(0-4): Half of scye measurement, then from 4, drawn the straight line (4-5) at 90deg angle with (1-4) in downwards.
(0-5): Half scye measurement, then from 5, drawn the line (6-7) at 90deg angle with (1-6) in downwards.
The divided lines (0-3) and (0-6) into four equal parts and indicate the points 8, 9, 10 and 11, 12, 13 respectively then down sleeve head by increasing (4-8) and (8-9), 1cm and 2.0cm from 10 in upwards. then "0" point 1.0cm increased from 11 is upwards and 12 point, curve is drawn from 13 in 1.0 cm downwards until the point 6 is found.
(5-14): One third of (2-5).
(7-15): One third of (2-7).
16: Midpoint of (5-14). then added (4-16).
17: Midpoint of (7-15). Then added (6-17). After the=at under arm seam line by drawn the curves (4-14) and (6-15).
Cuff:
(A-B) : Cuff size + 4cm.
(B-C): (cuff depth X 2) + 2.0cm
It is needed to make patterns for two cuffs.

Collar:
(1-2): Half of neck.
(2-3): Button stand + 1.25cm.
(1-4): There fourth of (1-2), then drawn three vertical lines on the straight line (1-3) from 1, 2 and 3.
(1-5): Width of collar and stand (generally 8.0 cm) + 2.0cm then from drawn a horizontal line with (1-2).
(1-6): Half of (1-5) then from 6 drawn vertical lines with (1-5) so that it indicates the point 7 and 8.
(8-9): 1.0 cm, then drawn a line from (3-9). 0.75 cm from (9-11) and (3-10).
(1-12): 0.5cm
(5-7): Drawn the style line.
Then added the points 12, 4, 10, 11, 7 and 5 and made half pattern of collar and then full collar is mad e from half collar. It can be made different way according to style.

Conclusion: >>>>>>>>>>>>>
